A design and 3D printing project in 3 key steps

march 2021
Project management in 3D printing, as in any other field, means putting in place appropriate processes and tools to succeed and leaving nothing to chance. The prior development of a multi-phase project plan is therefore essential to facilitate its management, limit the associated risks and deliver a quality product within the allotted time.
From A to Z, it is a collaborative process with all stakeholders (clients, teams, etc.), generally iterative, which allows for exchanges, changes and constant improvements.
All teams are involved:
- The sales team, in the front line when the customer’s needs are identified
- The R&D (research and development) team, which guarantees the feasibility of a project and the design of the product
- The quality and regulatory team, which contributes to the marketing of a medical device (MD)
- The production team, responsible for the printing and delivery of the final product
More specifically, we will share with you in this article some tips for a successful project through 3 key steps
Step 1
Starting a 3D printing project : a precise identification of the customer’s needs
When managing a product development project, you need to ask the right questions at the right time. You have to anticipate as many parameters as possible so that you are not surprised when you deliver to the end users.
4 essential questions before starting a 3D printing project :
- What are the objectives of the project (surgical simulators, anatomical models, medical devices… here an overview of 3 possible applications)
- What resources (human and material) will I put in place to carry it out? (Purchase of new materials, sharing of tasks with several engineers)
- What is the available budget?
- How quickly can I deliver my product? What are the expected risks (delays due to the supply of materials, project including additional research activity)
This is why it is necessary to listen to the client’s needs first. Depending on the project, this may be a doctor, industry representatives, director of a training institute etc. The engineers and sales representatives have the ability to adapt their communication to the person they are talking to in order to be able to advise him/her as best as possible on the product design he/she wishes to obtain. The team’s role is to guide them towards viable products that are adapted to their needs.
At the end of this phase, an estimate of the costs will be proposed to the client and adapted if necessary. We will then enter the development phase.
STEP 2
Developing a custom product is done with the right 3D printing technology
1 | The 3D development phase in the starting blocks
The project begins with a kick-off meeting to bring together all the stakeholders. At this point, the specifications are validated and we begin to discuss the origin of the input data that we will convert into an STL file
Depending on the type of project, several sources can be used to obtain the input data:
- Medical imaging (MRI/CT Scan) when it is a question of reproducing anatomical regions (in the case of surgical simulators for example),
- Optical scan (3D photo) of a part supplied by the customer that he wishes to reproduce,
- Dimensioning of a supplied part,
- Specifications provided by the customer.
- Medical imaging (MRI/CT Scan) when it comes to the reproduction of anatomical regions
- Optical scan (3D photo) of a part provided by the customer that he wishes to reproduce
- Dimensioning of a supplied part
- Specifications provided by the customer
The R&D engineering team discusses and advises the customer at the beginning of the project to determine which input data is most appropriate for the request.
Good communication with the customer is maintained throughout the project by exchanging information regulartly.
2 | The choice of 3D printing manufacturing technology based on the type of product required
The technology used will depend on the type of prototype desired, the variety of materials used (single or multi-material) and the time available for printing.
The different 3D printing technologies available on the market are summarised below:
In this process, the photopolymer material is projected onto the print bed and immediately solidified by a light source, usually a UV lamp. This technology is more expensive than others but provides excellent accuracy and detail. It is very useful for producing very realistic products (surgical simulators with multiple colours, textures and hardnesses).
This technology is based on molten wire deposition. It is practical for rapid prototyping that does not require high precision and does not necessarily require the use of several materials (multi-materials). However, this type of printing is inexpensive, fast and allows access to a wide variety of materials. This process can be used to produce parts such as small mechanical parts or small medical equipment such as visors, test tube beds, etc.
SLA technology is based on the light curing process. A photosensitive resin is polymerised (solidified) by a light source layer by layer. The cost of printing is higher than FDM but still affordable. It is generally used for the production of precise products with a limited time of use (surgical simulators, trays, etc.).
In this process, the photopolymer material is projected onto the print bed and immediately solidified by a light source, usually a UV lamp. This technology is more expensive than others but provides excellent accuracy and detail. It is very useful for producing very realistic products (surgical simulators with multiple colours, textures and hardnesses).
Multi Jet Fusion is a powder-based technology that does not use any laser device. Its specificity is to combine two agents: a binding agent to fuse the powder and a specific agent, called “detailer”, to smooth the surface. Mainly intended to make durable series parts, this process can be used to make anatomical models.
Whatever the product to be made, a good design office will be able to advise the client on the technology to be used.
3 | Computer-aided design in iteration with the client
The design is carried out on Computer Aided Design (CAD) software.
In the case where the input data is medical imagery, t he R&D team carries out a segmentation stage on dedicated software to transform the imagery into one or more 3D files (STL files) which will serve as the basis for the work. This involves colouring the areas of interest (for example, bone that is white on a CT scan) on segmentation software to obtain a geometry.
For example, the segmentation of a CT-Scan will enable the geometry of a mandible to be obtained and then from the geometry of the mandible a gum will be designed.
Thanks to the 3D drawings, the R&D team can communicate with the client on the design of the model based on the images of the virtual model and iterate until the client validates the 3D model. This exchange will enable the first prototype to be produced as close as possible to expectations.
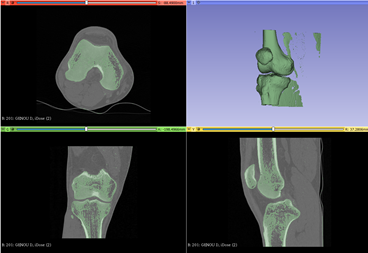
Figure 1: Example of a segmentation of a knee CT-Scan to obtain the 3D geometry of the different bone structures.
Figure 2: Final virtual model based on the geometry from the segmentation phase.
Step 3
Deliver and collect field feedback to continuously improve the 3D design
1 | Once the part is designed on the computer, 3D printing can be launched
The designed 3D files are then imported into a printing software. This software is specific to the 3D printing technology selected.
As described above, it is possible for some technologies (e.g. Polyjet) to allocate different materials for a single part in order to differentiate anatomical regions.
Being able to adapt the hardness and colour to best represent each part of a part is a sign of great expertise.
The printing process can now be launched.
2 | The post-processing phase: the last stage of the 3D printing manufacturing process
The manufacturing process does not stop when the part is printed. It is necessary to go through post-processing stages that are more or less long depending on the technology used to remove the excess material or in some cases the printing supports.
For example, in the case of Polyjet printing, this process includes
- Manual scraping
- Using a waterjet machine (pressurised cold water)
- The introduction of the parts into a soda tank
A first prototype of the model is obtained, depending on the complexity of the projects it may be necessary to make several prototypes before obtaining the final model.
3D printing allows you to iterate very quickly, which is a significant advantage in product development.
This iterative development is all the more efficient when you have your own printing machines on site; the R&D team and the production team can work more closely together.
Once the prototype has been validated by the customer during a meeting, the model can be manufactured in quantity (3D printing then post-processing) and then shipped.
3 I Monitoring and continuous improvement to improve performance
As soon as the models are put in the hands of the customers, the team continues to accompany them to ensure that their needs have been covered (during training sessions for example) and to collect their experience and draw positive and negative lessons from the completed project.
At Bone 3D, we ensure that all of these steps are covered to bring our clients’ projects to life.
We are constantly looking to improve our working methods and the quality of our products by taking into account user feedback through surveys: we progress every day thanks to you!
—
Did you like this article and would you like to know more about Bone 3D’s R&D activity? Don’t hesitate to contact us via our website here or via social networks here!